Cisco Data in Motion (DMo) Getting Started Guide
This document provides the information that is required to understand and install the Cisco Data in Motion (DMo) software.
This document is intended for developers or system administrators who want to install the Cisco Data in Motion software components. It assumes that you have knowledge or experience with system administration and the following:
- CentOS Linux
- UNIX and/or Linux File System
- Red Hat Package Manager (RPM)
- Virtual Machine (VM)
- Open Virtualization Appliance (OVA)
- Open Virtualization Format (OVF)
This document includes these topics:
- Minimum Supported Hardware Platform
- Installing Cisco Data in Motion
- Data in Motion Configuration UI
- Data in Motion Command Line
- Data in Motion Configuration
Minimum Supported Hardware Platform
Cisco Data in Motion requires the following minimum hardware components:
- centOS 7.x (64-bits) Operating System (OS)
- Cisco Unified Computing System (UCS)
- 2vCPU cores, 4GB vRAM (OVA Configuration for UCS-C/E)
- VMWare ESX or ESXi 5.0+ (Virtualization Platform)
- Oracle VirtualBox version 4.3.x+ (Virtualization Platform)
Install Cisco Data in Motion
Cisco Data in Motion (DMo) software can be configured and installed onto centOS 64-bits Operating Systems (OS) running as a Virtual Machine (VM) either on VMWare ESX/ESXi 5.0+ or Oracle's VirtualBox version 4.3.x or higher.
Install the Software
CentOS Terminal Window
Status Information

The OVA has been preconfigured to automatically start up the Data in Motion software as a background process and automatically stop the DMo process when centOS is shutting down.
To install and set up the Cisco Data in Motion software for centOS 7.x running as a VM, follow these steps:
- Download a copy of the latest Data in Motion centOS 7.x OVA.
- Import the DMo-RELEASE-OVA-39_308903.ova using either VMWare ESX/ESXi or Oracle's VirtualBox.
- Start the centOS VM instance and notice that the VM is preconfigured with 4 GB RAM and 2 CPU allocations.
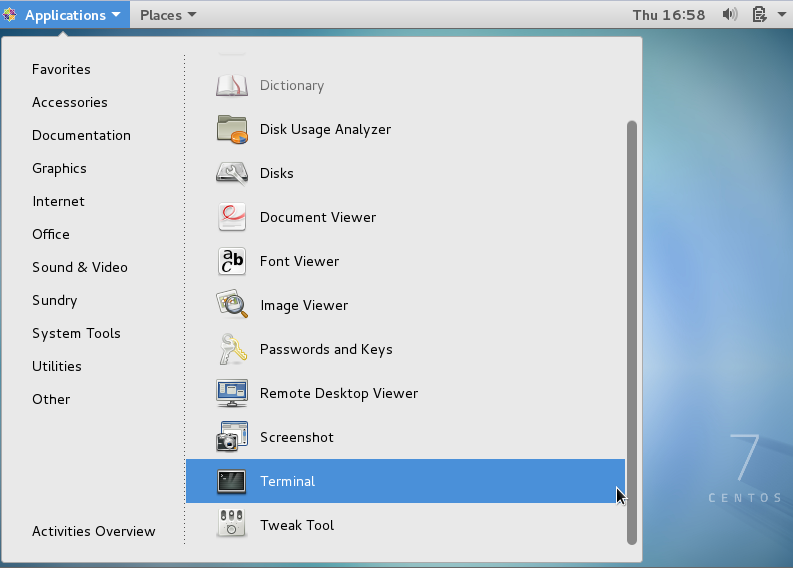
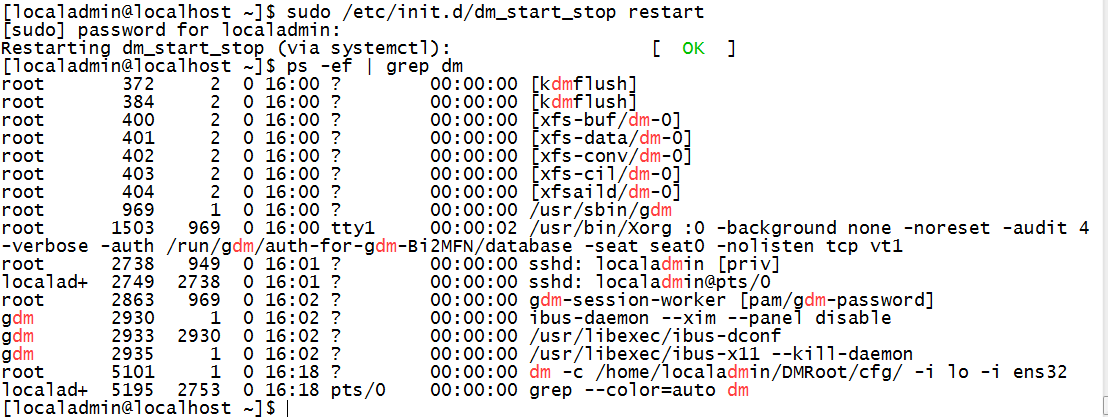
- A default Linux user account has been set up with userid – localadmin and password – dmo123. Log in with these credentials. After successfully authentication on centOS, open an instance of the UNIX/Linux Terminal shell window by clicking Applications > Systems Tools > Terminal, as shown in centOS Terminal Window.
- On the Terminal shell window, type the following processor status UNIX/Linux command to list whether the Data in Motion software is already running as a background process:
ps -ef | grep dm
The processor command should return at least the following indicator that the Data in Motion software is running as a background process:
dm -c /home/localadmin/DMRoot/cfg/ -i lo -i ens32
Manually start DMo
If Data in Motion did not automatically start up in the background, execute the following UNIX/Linux shell script as sudo root account access using same password dmo123.
sudo /etc/init.d/dm_start_stop start
DMo start stop script
Alternatively, the /etc/init.d/dm_start_stop shell script can also stop and restart as shown.
Usage: /etc/init.d/dm_start_stop {start|stop|restart}
sudo /etc/init.d/dm_start_stop start
sudo /etc/init.d/dm_start_stop stop
sudo /etc/init.d/dm_start_stop restart
Install the License
POSTMAN license install
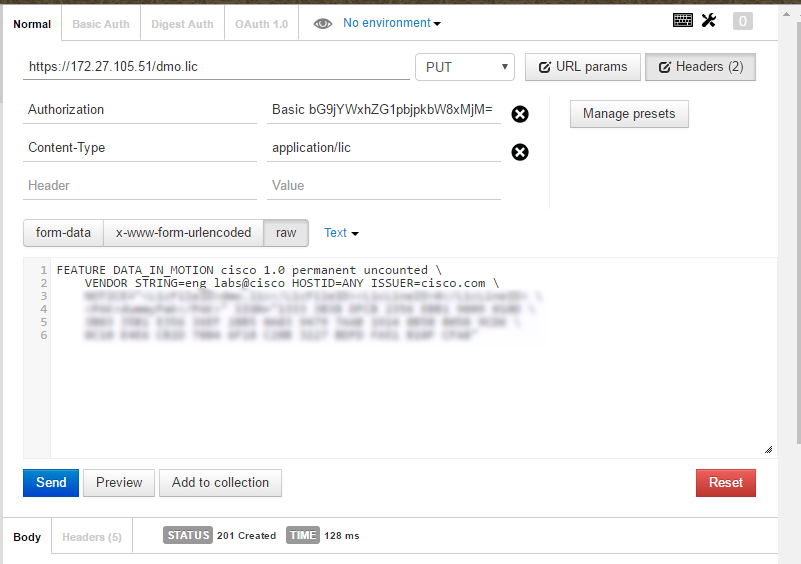
At this point Data in Motion will be running in minimal mode. Although you will be able to set up rules, the rules will not be executed. To make Data in Motion fully functional you will need to install a valid license. You should have received a valid license file along with your purchase of the Data in Motion product. If not, please contact the sales/support team to obtain a license.
To install the license, you can use the client API HTTP PUT command to upload the license key file. You will need to include the HTTP basic authorization header with the username/password combination as localadmin/dmo123 as well as HTTP header "Content-Type: application/lic"
There are two ways to install the license file:
Using curl commands
curl -kX PUT -u localadmin:dmo123 --header "Content-Type: application/lic" https://<IP of DMO OVA>/dmo.lic -d @<path to license file>/dmo.lic
Using POSTMAN
Restart the Data in Motion process for the license to take effect, using the following command:
sudo /etc/init.d/dm_start_stop restart
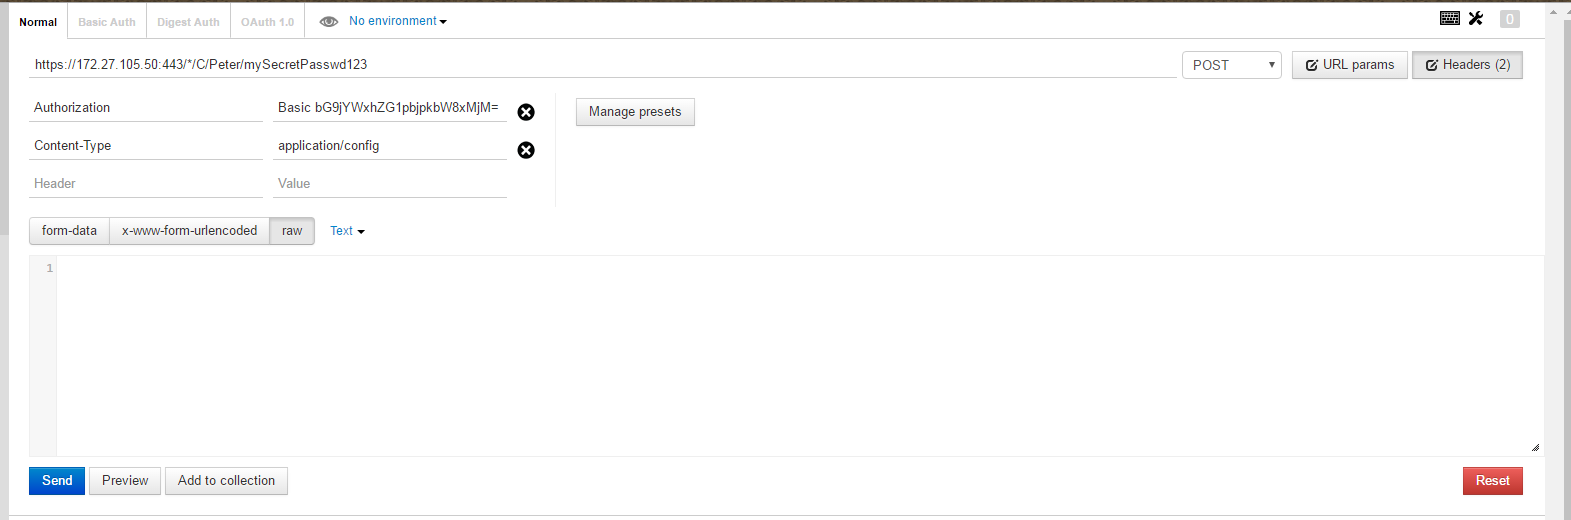
Create User Contexts
As the very first step, you must create a context within which you will start to add your rules. It is not recommended to add/install rules in the localadmin context. This section will show the syntax and two examples of creation using curl commands and postman.
You can use the client API HTTP POST command to create/modify/disable (see the definitions above) a context. You will need to include HTTP basic authorization header with either the admin's or an existing username/password. The URL patterns are as follows:
- Create Context—Allows the DMo Administrator to add a context user with a global password and configurations.
- Update Context—Allows the DMo Administrator to update username and password within a given context based on existing and new password. The Context users can also update their own password using their existing authorizations.
- Disable Context—Allows the DMo Administrator to disable the context and prevent users from logging in. You may be able to recover the contents of the context after this operation. (Request guidance from Cisco support.)
POST /*/C/Peter/mySecretPasswd123 HTTP/1.1
Host: 192.168.56.102:443
Authorization: Basic bG9jYWxhZG1pbjpjaXNjbzkxMQ==
Cache-Control: no-cache
Usage:
As an Admin, you are allowed to create, update/change password for a context and disable a context. You must set the authorization header with the value 'localadmin:dmo123' for the credentials.
Create Context - https://<ipaddr>:<configport>/*/C/<context name>/<context password>
Update Context - https://<ipaddr>:<configport>/*/U/<context name>/<new password>
Disable Context - https://<ipaddr>:<configport>/*/D/<context name>
As a regular user you can only update/change the password of your own context. You must set the authorization header with the value <your_context_name>:<your_context_current_password>
Update Context - https://<ipaddr>:<configport>/*/U/<new password>
HTTP/1.1 200 OK
Date: Tue, 17 May 2016 07:27:31 PDT
Server: Data in Motion v1.0, DM
DAV: 1
MS-Author-Via: DAV
Content-Length: 0
Content-Type: text/xml;
For example, to create a new user context called "Peter" with password "mySecretPasswd123," the HTTP POST message looks like the following:
If successful, the output should display as shown.
Create context using cURL
Context management using curl commands:
Admin create a context with user:Peter password:mySecretPAsswd123
curl -kX POST -u localadmin:dmo123 https://172.27.105.50:443/*/C/Peter/mySecretPasswd123
Admin update Peter's password
curl -kX POST -u localadmin:dmo123 https://172.27.105.50:443/*/U/Peter/newPassword
Peter update his own password
curl -kX POST -u Peter:newPassword https://172.27.105.50:443/*/U/mySecretPasswd123
Admin disable Peter's context
curl -kX POST -u localadmin:dmo123 https://172.27.105.50:443/*/D/Peter
Create context using POSTMAN
Creating Using Postman
Context management using POSTMAN:
Install Data in Motion Rules
After the context are created, You can install rules to monitor traffic. Rules are defined in JSON format and are installed using HTTP PUT methods. Below are some ways to install rules on Data In Motion. For more information on the structure of the JSON rules, please refer to the Data in Motion API Documentation.
Install rules using curl commands
eventRule1.json

{"meta":{"ruleid":"eventRule1","context":"demo","cache":"129"},
 "network":{"protocol":"tcp","filter-by":{"srcaddr":"192.168.1.107","sport":"5001"},"content":"application/json"},
 "content":{"query":"temp>45"},
 "action":{"name":["getPayload"],"type":"event","endpoint":{"method":"http","addr":"172.27.105.50","port":"6000"}}}
Using the example JSON rule eventRule1.json, you can install it using the curl command with the following arguments.
curl -kX PUT -u demo:demo123 -H "Content-Type: application/config" https://<IP-of-DMO-OVA>/eventRule1.json -d @eventRule1.json
Install rules using POSTMAN
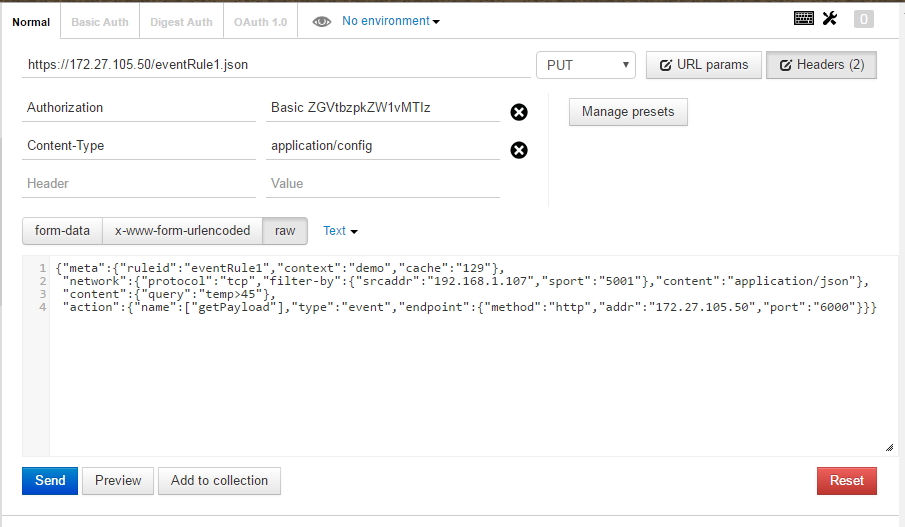
In postman, rules can be installed using HTTP PUT method with the url: https://<ip of DMO OVA>/<rulename>.json. Make sure the Authorization field is set to Basic with username matching the context name and the corresponding password. The Content-Type header field should be set to "application/config". The rule content is included in the payload.
Install rules using Data in Motion Configuration UI
The OVA comes prepackaged with a simple UI with which you can configure rules on Data in Motion. The OVA uses nodejs to run the UI. You can access the UI, locally on the OVA, at http://localhost:8000.
The following steps will go over how you can connect to the Data in Motion instance and create a rule. It assumes that the context user demo has been created using previous instructions.
Step 1 – On the browser go to the url http://localhost:8000. You will be asked for login information. Enter the IP address of the machine running Data in Motion (This example demonstrates logging into the DMo instance running on the locahost) and the port on which Data in Motion listens for configurations (the default is 443).
DMo GUI Login Page
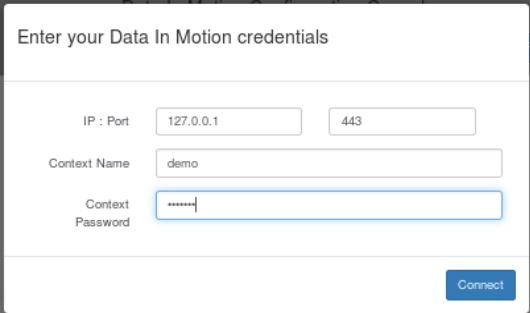
Also provide the context name and password you want to login to. The following demonstrates logging into the a user created context - demo:demo123.
DMo GUI Main Page
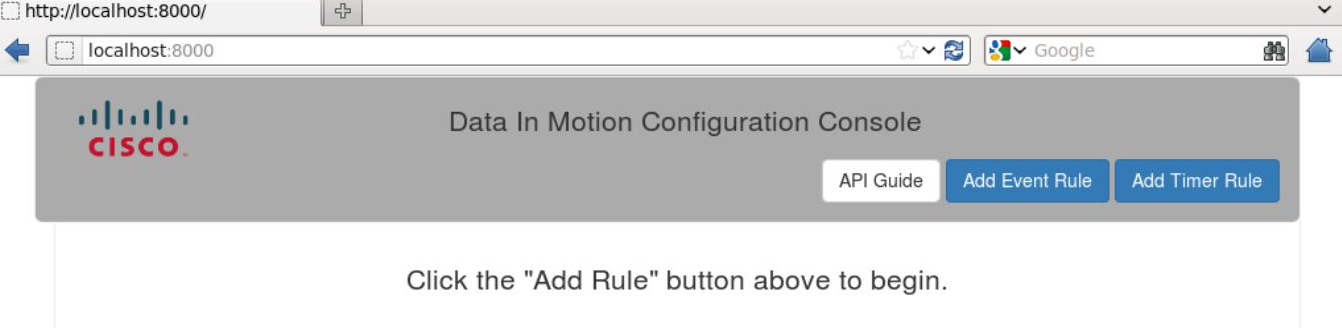
Step 2 – Once logged in, you will see all the rules that have been installed in this context.
Step 3 – You can add a rule by clicking on either the ‘Add Timer Rule’ or 'Add Event Rule' button on the top right of the screen.
Step 4 – The following shows the event rule creation window. There are tooltips for each field that describe what parameters the field takes and how it must be used.
DMo GUI Rule Pages


The following figure shows a simple rule named eventRule1 to capture TCP packets whose source address is 192.168.1.107 and source port is 5001, apply a json parser on the context and generate an event if the content has “temp>45". The event will be sent to the destination 172.27.105.50 on port 6000 using the HTTP PUT method.

Step 5 – You can view how the UI converts this to the Data in Motion JSON rule representation by clicking the ‘See JSON’ button. The following figure shows the JSON for the above rule


Step 6 – Click the ‘Create’ button to add the rule to your context. Once added, you will be able to view the rule.
Step 7 - Click on the pencil to go back to editing the rule
Step 8 - Click the trash can image to delete the rule from the context