WebACD Plug-in Example
Use the information here to create a plug-in to work with the WebACD client
Preparing the Environment
In order to create a plug-in for the WebACD client, the following requirements must be met:
- OS: Win2000 or higher.
- IDE: VC6.
- Library: ATL3.0.
In addition to the above, WebACD SDK contains two types of files.
- Header files: Eventdef.h and Utils.h.
- Type library file: waidl.tlb.
Writing Your First WebACD Plug-in
Here are step by step instructions on how to write a WebACD plug-in. This tutorial is broken up into seven parts:
- How to create a standard ATL project.
- How to create a COM object and import the WebACD Typelib.
- Initializing your plug-in.
- Adding event handler code.
- Writing the preference window for the plug-in.
- Programming with the WebACD SDK.
- Installation of the plug-in.
Creating a Standard ATL Project
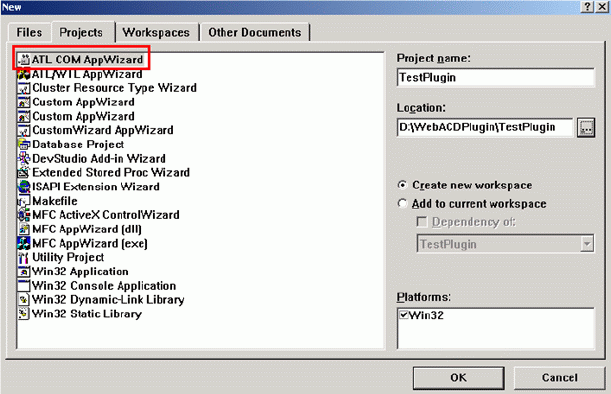
The WebACD plug-in is a COM component. Therefore you need to create an ATL project for your plug-in using the ATL COM AppWizard.
- Open VC6.
- Under the File menu choose New -> Projects and select the ATL COM AppWizard.
- Follow the instructions in the wizard to create a new ATL project named TestPlugin.
Create a COM Object and Import the WebACD Typelib
Once the project has been created, the next step is to open the ATL Object Wizard and create a Simple Object named CWATestPlugin. Make sure to use the default object attributes when creating the object.
Now that the object has been created, some additional code needs to be added in order to convert it into a WebACD plug-in.
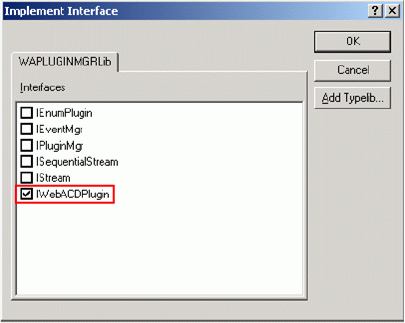
1. The first thing to do is to make the CWATestPlugin implement the IWebACDPlugin interface.
In order to do this, first right click on the CWATestPlugin and select ¿Implement Interface'. VC will then notify you that it is ¿Unable to find a typelibrary for this project'. Click OK and select the ¿Browse Type Libraries' dialog button. Click the ¿Browse...' button to find and select the waidl.tlb file.

Next select the ¿Implement Interface' dialog box and select the IWebACDPlugin option.
Finally you need to add the ¿Eventdef.h' to the object's header file. In order to do this put the following line of code into the header file:
#include "../h/EventDef.h"
2. The next thing that needs to be accomplished is to make the CWATestPlugin implement the WebACD category. This is accomplished by the following code:
    BEGIN_CATEGORY_MAP(CWATestPlugin)

        IMPLEMENTED_CATEGORY(CATID_WEBACD_PLUGIN)

    END_CATEGORY_MAP()
3. Finally the plug-in needs to have a macro added in order to handle the Event.
- Add the following macro to the object's class definition:
BEGIN_EVENT_SINK_MAP(CWATestPlugin)

END_EVENT_SINK_MAP() - Add
IMPLEMENT_EVENTSINK_MAP(CWATestPlugin)to the object's .cpp file. - Finally delete the default OnEvent implementation by changing the code to look like the following code:
STDMETHOD(OnEvent)(ULONG pEventData);

        // {

        // return E_NOTIMPL;

        // }
Initialize Your Plug-in
In order to initialize the plug-in, three items must be accomplished.
- Set the plug-in name.
- Create the preference window.
- Get the WebACD CSR ID.
In order to accomplish these tasks, the following code needs to be added to your plug-in.
    STDMETHOD(Init)(ULONG pInitInfo)

    {

        ATLASSERT(pInitInfo);

        INITINFO* _InitInfo = (INITINFO*)pInitInfo;

        Istrcpyn((TCHAR*)_InitInfo->szNameBuf,_T("TestPlugin"),

        STRING_BUFFER_SIZE);

        m_pEventMgr = _InitInfo->pEventMgr;

        m_pEventMgr->SubscribeEvent(EVENT_CSR_STATE_CHANGE,

        CLSID_WATestPlugin3);

        //Create the preference window

        m_wndPreference.Create(::GetDesktopWindow());

        _InitInfo->hWndSettingPane = (WNDHADLE)m_wndPreference.m_hWnd;

        return S_OK;

    }
Add the Event Handler Code
Now that the plug-in has been initialized the next step is to add the event handler code. The first thing that must be done to accomplish this is to subscribe to an event. This is accomplished by the following code:
    m_pEventMgr->SubscribeEvent(EVENT_CSR_STATE_CHANGE,

        CLSID_PhonePlugin);
After subscribing to the event, you have to add the event handler macro and the handler function. In order to handle a WebACD client event, you have to add ON_EVENT(EVENT_ID, Handler_Function) between BEGIN_EVENT_SINK_MAP() and END_EVENT_SINK_MAP(). In the example provided this produces the following code:
BEGIN_EVENT_SINK_MAP(CWATestPlugin) ON_EVENT(EVENT_INCOMING_REQUEST, OnIncoming Request) Once you have created the handler function and macro, it is time to create a way for you to extract event data. This is done through the event handler function's
END_EVENT_SINK_MAP() int OnIncomingRequest(EVENTDATA* pEventData);pEventData pointer and the EXTRACT_EVENT_INFO macro.
                 IncomingRequest request;

                 EXTRACT_EVENT_INFO(pEventData, &request);
You can now use this data as you see fit. In this example a pop up dialog box is produced to show the request ID:
             TCHAR szBuf[STRING_BUFFER_SIZE] = {0};

                 ::MessageBox(NULL, _ultoa(csrState.tostate, szBuf, 10), NULL, 0);
Finally after handling an event, you can return a value to the WebACD client through the
CEventData::OnEventReturn(): In the example provided the code would look like this:
pEventData->onEventReturn(DWORD_PTR(12345)):
Writing the Preference Window for the Plug-in
You can write a preference window for your plug-in and transfer the window handle to the WebACD client during initialization. Once the window is created, it should only be destroyed once the plug-in has been unloaded. Also, you must make sure to hide the window after it has been created. For this example, a mode less preference dialog will be created for the plug-in.
    {

    public:

        enum{IDD = IDD_DIALOG1};

        BEGIN_MSG_MAP(CPluginPreferencePance)

        END_MSG_MAP()

    };
Programming with the WebACD SDK
At this point you can continue to work with the WebACD events available to round out your plug-in. However, when creating phone or ticket plug-ins, you need to make sure that you use the following CLSIDs.
const CLSID CLSID_TicketPlugin =

        {0x450A604E,0xE547,0x47EF,{0x98,0x85,0xAE,0x2A,0x53,0xBA,0x3E,0xD

        8}};
const CLSID CLSID_PhonePlugin =
{0x0F496ED2,0xB640,0x48FA,{0xBE,0x94,0x63,0xE1,0xF1,0xDD,0x39,0xB
8}};
After you have created the plug-in you desire, make sure to test the plug-in with the Test client.
Installation of the Plug-in
Now that you have created your first plug-in, it is time to register it. In order to accomplish this, there are a few items that must be completed.
- ¦ Register the plug-in with a non-admin priority. ¦ If you are using the Vista operating system the dependent dll file is ATL.dll. ¦ You should transfer FALSE to the _Module.UnregisterServer. This is done using the following code:
     STDAPI DllUnregisterServer(void)

            {

                     return _Module.UnregisterServer(FALSE);

} - Congratulations, you have now created and installed your first WebACD client plug-in. By following the above directions, you will be able to create more complex plug-ins that allow you to fully utilize the WebACD client.